Showing posts with label Redmi Note 4G. Show all posts

Sunday, 24 April 2016

Deploy and Debugging the Android applications in Redmi MI Note mobile from visual studio using C#

In this post we are going to see how to Deploy and debugging a android application  in Android device,  I am deploying the application in my mobile phone which is Redmi MI Note , KitKat version.

Initially my mobile was not detect in my machine to deploy and debug the application, this is because of not enable the developer option in my mobile. Here HiAndroid is the App Name


First we see how to enable the Developer option in the Xiaomi Redmi MI Note ....Before enable the USB debugging in your device , you have to enable developer option, developer options disabled as default.

Step 1 : Unlock Redmi Note
Step 2: From Apps , Go to settings
Step 3: Under settings, scroll down to the bottom of the page and click about phone
Step 4: Tap About Phone
Step 5: Under the About phone, we can see the MIUI version
step 6 : Now Tap MIUI version 7 times continuously, to enable the developer options
Step 7: Now you can see the message " Now you are a developer" , Now enable the USB debugging
Step 8: Go to Settings
Step 9: under settings, go to the bottom, to find the Additional settings, 
Step 10: Tap on additional settings,
Step 11: Tap on Developer options
Step 12: Under the Developer options, you can see the Enable USB Debugging Options,
Step 13: Now enable the USB Debugging option


After enable the developer option connect it with the machine , now you can able to see the Device in visual studio, along with other emulators.


Now you can run the application by click the device button, it will deploy the application in mobile and start running, Now here i am created a debug point on button click, so whenever user click on the button , it will hit back to the visual studio from the device.


Now in my code i have debug point on button click.

Layout:
***************
using System;
using Android.App;
using Android.Content;
using Android.Runtime;
using Android.Views;
using Android.Widget;
using Android.OS;

namespace ToastAndroid
{
    [Activity(Label = "HiAndroid", MainLauncher = true, Icon = "@drawable/raj")]
    public class MainActivity : Activity
    {
       
        protected override void OnCreate(Bundle bundle)
        {
            base.OnCreate(bundle);

            // Set our view from the "main" layout resource
            SetContentView(Resource.Layout.Main);

            // Get our button from the layout resource,
            // and attach an event to it
            Button button = FindViewById<Button>(Resource.Id.Submit);
            button.Click += Button_Click;

        }

        private void Button_Click(object sender, EventArgs e)
        {
            Toast.MakeText(this"Hi How are you ?"ToastLength.Long).Show();
        }
    }
}


Main.axml:
********************
<?xml version="1.0" encoding="utf-8"?>
<LinearLayout xmlns:android="http://schemas.android.com/apk/res/android"
    android:orientation="vertical"
    android:layout_width="fill_parent"
    android:layout_height="fill_parent">
    <Button
        android:id="@+id/Submit"
        android:layout_width="fill_parent"
        android:layout_height="wrap_content"
        android:text="@string/Submit" />
</LinearLayout>


When users click on the button submit in application, the control moves from phone to computer and hits the debugging point , then after debugging it results in toast message "Hi, How are you ?"


The result of this application is a simple Hi toast message.


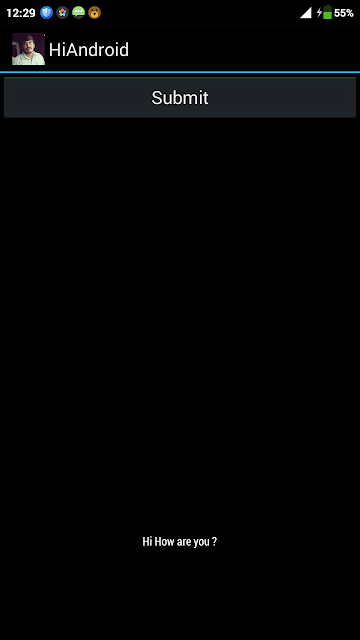
You can see the app in the start page like below in the name of " Hi Android"


From this post you can see how to deploy and debug the android application in Redmi MI Note mobile from Visual studio using C#


Saturday, 7 February 2015

Redmi Note 4G Link Apps to External SD Card

In this post we are going to see about the Redmi Note 4G Links Apps to External SD Card. If you already bought a redmi note 4G or hereafter you are going to buy, then after a certain time you will face a issue like space problem, Even the Redmi have External SD card supports up to 64 GB, many of app installation files is placed on internal memory. This is actually happens for my phone, so after a certain stage, i started to install many Car games, shooting games and Apps, My phone internal Memory total space is 8 GB, but available Free space is reduced to 1 GB and less, so started to search for a alternate solution.

Alternation Soultion is straight away play the Games or Apps from the External SD card instead from internal memory, so have to link the app to start from the external memory card, by changing the address to link.

But when i try it, i found some suggestions in google, i.e MI Doesnt support it, due to performance problem of loading data from the SD cards, and also Power Consuptions problems to load the external memory card.

If MI doesnt support it, then how we can do that, then i found one solution which makes my app to move and work from SD cards.

1. Rooting and UnRooting Redmi Note
2. PhilTouch CWM Recovery
3. Partition Magic for SD card - Needed for Link2SD app
4. Make SD to writable 
5. Transferring app to SD card using Link2SD app


Rooting Redmi Note:
********************************************************

  • Download the file in computer Rootonly_beta.zip
  • Rename Rootonly_beta.zip to update.zip
  • Connect the phone with computer in USB
  • Open the internal storage of phone and paste the file update.zip in the internal storage. Switch of the Phone 
  • Press the Power button + volume up button > it will boot in the recovery mode
  • Select Language > install update.zip
  • Wait for phone to Reboot
  • Go to Security application  > Permission > Root Permission > Slide Enable it.


Now you are rooted, You have to be rooted to do the following steps.

click the link to download Rootonly_beta.zip
MI Redmi Note 4G Rootonly_beta.zip


PhilTouch CWM REcovery
********************************************************

  • Download the zip here by clicking Download CMW Recovery
  • Rename to update.zip.
  • Copy that to the root of the sd or internal phone storage.
  • Enter mode recovery (turn by holding down Vol + and Power Up until the logo appears).
  • Select English.
  • Run the "Install System to update.zip" option.
  • Restart.
  • Again enter mode recovery (turn by holding down Vol + and Power Up) This time you will see CWZ
  • Reboot back to device
  • CWM recovery can be use to backup your devices. It saved me many times.


Partition Magic for SD card:
********************************************************

  1. Download MiniTool Partition Click Here download it and install it on PC.
  2. Insert your SD card to a card reader and open it on your computer.(not via USB cable)
  3. Back up all your files to the computer because partitioning will wipe your data.
  4. Open Mini Tool in your computer. Locate your SD card (be careful in choosing and make sure not to choose the drive of your computer)
  5. Right click and choose Delete
  6. Right click on it again and choose Create New. Create “FAT32″ partition (This is where all your media files will go. Be sure to make it bigger than the 2nd part)
  7. Select “Create as: PRIMARY”
  8. Next, create an ext2/ext3/ext4 partition (I suggest ext4 after experimenting with my Mi Note, it works better with ext4). This is where your apps will go. I suggest a value of 2000 MB ~ 3000 MB would be big enough but its ur choice...
  9. Select “Create As: PRIMARY” (make sure that it is both set to primary because it will not work if it is not set to primary)
  10. Click the “Apply” button on the top left corner and wait for it to finish the process. Done.
  11.  Put back your SD card to your phone and switch it on


Make SD as writable:
********************************************************
  • Open Google Play store on your phone
  • Search exact word: SDFIX
  • Select and install SDFix: Kitkat Writable (by NextApp Inc)
  • Open up the App and follow thru
  • Reboot phone, and you are done

Transffering App to SD card:
********************************************************
  • Open Google Play store on your phone
  • Search exact word: Link2SD
  • Select and install Link2SD


1. Run the app (Link2SD) on the phone. If the app is requesting the SuperUser access touch "allow"       option.

2. For the first launch, if you've been partitioned your SD card, the app will shown a popup option           Choose EXT 4 as previously formatted on your computer, and restart your device after that, and re-     launch Link2SD after restarting. If there's shown an "error mount   script" warning, you have to re-     partitioning your SD card. I suggest you to change the file system  on the SD card's 2nd partition         (if you use ext2 before, use ext3 / ext4 / FAT32 file system when re-partitioning)

3. Now it's done. choose the apps that you wants to move to SD card's 2nd partition. Touch / tapsoftkey (capacitive button or "option" key) choose multi select option, and you can touch the select all option, or you can choosing manually by tick the apps one by one. Choose actions after that.

4. There will be shown the other menu on Link2SD, then choose create link.

5. Tick all the options, then click OK.

6. Wait till Link2SD moving all the apps to SD card's 2nd partition. When it's done, you can check the memory status on your device. Touch the softkey, and then choose storage info.


Uninstalling / removing system app with Link2SD
********************************************************
That is pretty easy to use this feature. All you have to do is choosing one or more system apps that you want to remove, then choose action.

Next, choose uninstall on the option

Then Link2SD will shown a warning message, to confirming about the removal, read it carefully. If you're sure enough, simply click OK.


UnRooting Redmi Note:
********************************************************
If you need to UnRoot Redmi note then simple steps
  • Download the UnRootonly_beta.zip file from computer
  • Rename the UnRootonly_beta.zip to update.zip 
  • Open the internal storage of phone and paste the file update.zip in the internal storage. Switch of the Phone 
  • Press the Power button + volume up button > it will boot in the recovery mode
  • Select Language > install update.zip
  • Wait for phone to Reboot
click the below link to download UnRootonly_beta.zip


I hope this post will helpful for the users who are trying the Apps to move to SD card, to make more internal memory available in Redmi Note 4G.